Now it’s time to balance and actually use the thing!
Balance
A Steadicam cannot work properly if the rig is not balanced.
Again, this is a simplified version of balancing. To really learn, you gotta get your hands on a rig, or at least observe a Steadicam operator as they prep.
First of all, you need to find the center of gravity, or cg, of the camera. After the camera is built (i.e. it has all the accessories and lens you’re going to use for the shot) you can find the cg by rolling the camera body on a rail. Where the camera is balanced on that rail, mark with a piece of tape or just remember where it is.
The camera is placed on the sled via the cheeseplate on top.
The post is lengthened to the appropriate length. This is in relation to how much weight is on the camera at the top.
On the top stage are the adjustment knobs to move the camera right and left or front and back. This is the fine adjustment.
If the rig is perfectly balanced while stationary, you’ve achieved “Static balance.” If there’s time, proceed to:
“Dynamic Balance.” Spin the post on the balancing peg and see if the camera tilts any direction. You then make corrective adjustments with the fine adjustment knobs, moving the monitor in/out and moving the battery in/out.
adjust the tension on the arm so the camera floats where you want it.
the vest is adjusted to the operator’s body so it doesn’t slip and pressure is exerted evenly across it.
Operating
Actually operating the Steadicam requires a lot of physical and internal adjustments.
The operator has to have good posture. They walk forward, smoothly, making minor adjustments as needed. They avoid accidentally cross stepping, so they don’t trip.
While the operator’s feet carry them where they need to go, their hands are busy making sure the camera is where it needs to be pointed. The left hand is on the gimbal, in charge of panning, while the right hand lives on the handle that connects to the arm, moving the rig up and down as needed.
For more in depth information about Steadicam operating, check out the Steadicam Operator’s Handbook by Jerry Holway and Laurie Hayball.
When the Steadicam operator walks on set and starts setting up their gear, it can look pretty impressive. Here’s this guy or gal with cases of specialized equipment that looks like it belongs to Robocop.
Or maybe Alien.
Contrary to this picture, Steadicams are not all that great at eradicating alien threats.
So what part is the Steadicam?
Ah, not an easy answer actually.
I’ve worked with a number of newer directors, and there’s a bit of a learning curve I often have to help with there. Sometimes I’m asked “So you have a Steadicam? What camera is on there?” And I answer, cautiously, “Whatever camera you want within the weight limit.” But then I figured out…some folks don’t know the camera is actually not part of the Steadicam. The Steadicam is the device that moves the camera around. It’s a dolly if it had feet and shock absorbers instead of wheels and rails. It’s a tripod with an ego. And it’s also not those things.
The Steadicam mainly consists of 3 major components: The Sled, The Vest and the Arm.
Pictured are parts of the Steadicam M-2.
Sled
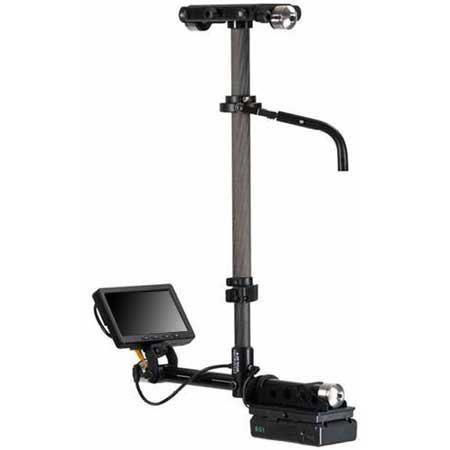
Pictured is a Steadicam Pilot, a smaller rig for DSLR sized cameras.
The Sled is the post you see here. The camera is mounted on top, there’s a monitor at the bottom, and batteries power everything from the bottom. This is where the electronics live. There’s wires inside that travel from the top of the top stage to the very bottom where the batteries and monitor reside.
Arm
Pictured is a G-70x arm. This arm can handle 13-70lbs of weight.
The arm is really where a lot of the magic happens. The arm has sections and springs that compress or expand to lift or lower the rig with ease. The arm also isolates movement, taking away the natural bounce of a human’s walk and translating it into smooth moving video.
Vest
Two types of vests pictured above: A Fawcett Exovest and a GPI Pro vest. There are several varieties.
The Vest is where this contraption connects to a human body. The vest takes the weight and distributes it across the body. They are quite adjustable. Only in certain cases will an operator need to get a specific type of vest, due to small size or even just preference.
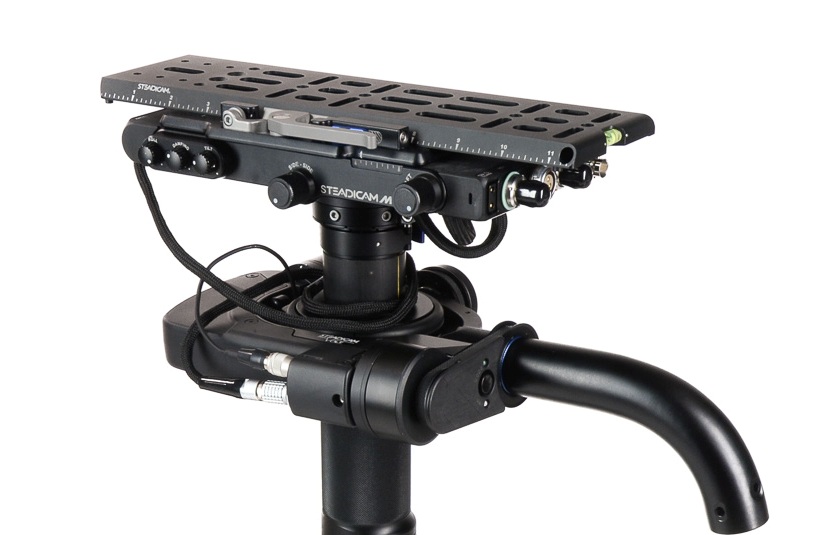
Let’s take a look at the top of the sled
Here’s an example of the top stage (top platform where the camera ends up being mounted). There’s a plate that goes on the very top that you screw the camera into. Adjustment knobs on the sides move that plate either left and right or front and back. This will serve in helping balance the camera.
Also on the top stage are all sorts of places to plug in wires! Several of these inputs are to get power from the battery at the bottom into the camera or to power the accessories. Why not just leave a battery on the camera when you put it up there? Well, you can, but anything you put on the Steadicam will add more weight. Sometimes, you gotta remove as much weight as possible.
You can also see the SDI inputs (pictured right, at the short end of that top stage). This is how you get the video feed from the camera to the monitor at the bottom of the sled.
The Gimbal
This is the handle that sticks out from the sled post and connects to the arm.
The gimbal is 3-axis, meaning it moves freely in three directions for pans, tilts and roll. The gimbal handle that connects to the arm is where the right hand goes, and the handgrip below on the post itself is where the left hand goes. This can be reversed for left-handed users who operate “goofy footed.”
Other Accessories
Plenty of other accessories and mounting devices enable the Steadicam operator to work in different conditions. There are mounts so they can operate from a car, more advanced gimbal technology in the form of the Volt, and things like rickshaws and the Trinity to change the possibilities of what operating can offer.
But this is an intro series and you’ll have to dig into all that when you decide you want to learn more.
I had the honor of co-hosting a Steadicam workshop for the Women in Focus Summit alongside fellow operator Kurush Bakhtiari. The event run by Ladibug Studios and ColourCo Rentals had several informational panels on camera, lighting and directing with a focus on getting more women and non-binary folks into production.
Kurush with his Archer and Klassen vest, me with a Zephyr kit.
I didn’t expect all of our attendees to take up the mantle of Steadicam. Sure, maybe we inspired a person or two who was curious or knew nothing about the skill, but learning about Steadicam is not just for the people who will wear the vest.
Plenty of crew members interact with the Steadicam operator: The AC who builds the camera to go on the rig, the grip who takes the rig off the operator when they need a break, the other grip who acts as a spotter for safety. Widen your parameters also to the 1st AD who is trying to keep a schedule and time transitions between sticks and camera accordingly, and to the director and DP who will be asking the Steadicam operator to bring their vision to life.
Understanding the roles, responsibilities and limitations of other positions on set just makes you better at your own job.
This will be a 3 part series to go over the basics.
What is a Steadicam?
Pictured: The Arm, Sled, Docking Station and Vest of a M2 model Steadicam.
A Steadicam is a tool used to create fluid dynamic shots unlike any other camera movement apparatus. It consists of a vest worn by the operator connected to an articulating arm and a post that holds the camera and electronic components. The arm does the job of evening out the natural bounce of a body walking, smoothing out the shot. If you were to attempt the same with handheld, it couldn’t be as smooth. Even if I breathe with a camera on my shoulder, the movement translates to the image.
Examples
Popular Steadicam examples include the stairs run from Rocky, the hallway shot in The Shining, and the Copacabana scene in Goodfellas. If you haven’t seen those, by all means click the links and watch the clips. Since those are the most commonly used examples, I wanted to show some fresh ones. Kurush and I put together a video of examples of a handful of other movies that have inspired us.
What we can learn from these examples:
Point Break: The camera expertly follows a high energy scene in a police station, whipping between characters and moments to carry the scene forward. This is a more interesting take on the typical police station scene without being static and stoic. This clip gives a real sense of space in the station, from the character’s entrance to how he moves around the bullpen. This shot switches between framing the main two characters from behind, getting a wide shot of the entire place, and returning to frame the main characters from the front. There’s a nice variety of shots without ever needing to break away for coverage.
Snake Eyes: In this example, we see how perspective changes as the Steadicam moves around the scene. At one point, the Steadicam becomes the point of view for one character, the boxer. When we reveal who it is, the Steadicam backs up to include him physically in the scene.
Birdman: The movie is depicted as if it is a single camera following characters around for a continuous shot. Since that is the technique, shots are constructed by the camera moving closer or farther away from speaking characters, moving around the stage to reveal things and traveling between locations around the theater by following one character at a time.
Baby Driver: This is near the beginning of the film, introducing Baby and his connection to music in the film. This is a well choreographed and timed performance between the camera operator and actor. See how things are revealed as Baby walks how each element of the scene adds to the soundtrack (honking cars, a trumpet player on the street, pedestrians). Pay attention to the background on a second watch of the scene.
Last Night in Soho: In this thriller, Eloise is experiencing flashbacks to the 60s to a vivacious woman named Sandie and a connection to a series of murders. Eloise sees herself in Sandie’s perspective, sometimes in the mirror, and sometimes replacing her in the scene. This is another well choreographed number. In the video I included the behind the scenes clip showing the Steadicam operator. Note how Eloise waits for her turn to cut in to the dance, and how moments are revealed as the Steadicam travels around the main characters. You can also see a spotter helping the Steadicam out. There’s a lot of moving parts and nobody wants to have a camera run into them!
In Part 2, we’ll talk about the components of the Steadicam and why balance is so important.
The mark of a good director and cinematographer duo is telling a story clearly through the images that appear on a screen. The great ones find a way to go above and beyond.
One particular shot that separates the women from the girls is the “oner” or “one shot” take. The camera follows the action for a long period of time. Often this can be on a Steadicam, but you might find a fantastic oner accomplished handheld, on a dolly, or on a camera crane. Usually these are dynamic moving shots that change framing and action before your eyes, whereas a normal setup would be to edit a series of shots together.
It’s harder to do things this way, and so the oner must be deliberate and planned to perfection. It’s something you might want to try in your next film.
The best way to design something complicated is to study those that came before you. Here I’ve given four examples of incredible oners that I admire and I know you will too.
The Haunting of Hill House Season 1 Episode 6 “Two Storms
A large chunk of Netflix’s The Haunting of Hill House Episode 6 is a 17 minute long oner that spans huge passes of time, flashbacks, special effects and more. It’s an incredibly complicated task that helped tell this unique story.
Part of what makes this scene so surreal is the fact that it doesn’t break away, doesn’t give a respite from following each character around during this pivotal storm. This genius choreography couldn’t have been pulled off without careful timing and a large well-rehearsed crew and cast.
You can watch the whole episode on Netflix, but you also can get the idea from this clip:
Also worthy of watching is this Making Of Featurette, which shows some of the ways this complicated long shot was choreographed:
Children of Men (2006)
The car scene. Not only is this a long take, it’s fraught with anxiety, showing different views out the windows of the car, placing the viewer in with the passengers of the vehicle. The drama unfolds in real-time, starting off with an innocuous car ride and conversation, escalating into a mad dash away from a hoard of crazy people attacking the car’s occupants.
The way they filmed this scene is actually pretty incredible and technical. At about 1 minute into this featurette, they discuss this particular scene. They used the Sparrowhead Doggie cam, a camera suspended inside the car on a track. The car was also specially designed for this scene. The driver is not actually driving it — there’s a man in front of the car low to the ground who is actually doing the driving. They don’t show it here, but they actually had seats that folded out of the way so the camera could get past the actors.
Birdman
Now this one gets an honorable mention because the whole movie is structured like it takes place in one long take. There are a number of hidden cuts that make this possible, but there are certainly a number of true long takes. You experience in real time Riggan getting stuck outside the playhouse during the performance and having to navigate a busy Times Square in his tighty whities.
At about 45 seconds into this video, you see a grip positioning a silk in order to adjust the lighting on the actors faces on the fly. The whole movie had to be choreographed with the actors and crew in this way in order to avoid setting up classic lighting scenarios and keep things on the move.
Baby Driver (2017)
It’s Bank Robbery: The Musical but oh so much more. I recently re-watched this movie and I’m telling you — if you haven’t seen it yet, there’s no time like the present.
Baby Driver‘s premise is genius — Baby has tinnitus from a car accident, so he’s constantly playing music through his headphones to drown out the ringing in his ears. That sets the soundtrack to which all the action happens throughout the movie. The car chases, bank robbery, shootouts — everything has been meticulously choreographed and timed to fit the music of the scene.
Check out the “coffee run” scene from early in the movie to see the level of choreography that went into the scene. Not only do the Steadicam operator and Ansel Elgort walk perfectly timed, the action also lines up with key bits of set design — watch for the trumpet and certain bits of graffiti and poster designs that link up with lyrics in the music.
Look at the graffiti that says “Right” at 0:32 and 2:31 you’ll see they added in the lyrics “Shake, shake, shake” and several new lyrics on that wall during the shot. Excellent details.
Kidding Season 1 Episode 3 (2018)
Check out this incredible scene from the Showtime series Kidding.
This scene shows how the character Shaina is inspired by a show and how her life dramatically changes in a shifting scene that transcends time.
This is some incredible behind the scenes here because you can see just how the crew choreographed and shifted the scene from the drab, dreary beginning to a lavish apartment by the end of the scene. Watch and listen to the careful choreography dictated by either the 1st AD or coordinator.
6 Types of One-Take Shots
For some more examples, and descriptions of specific oners (the establishing long take, the exposition, the tracking long take, the fake long take) check out Aputure’s video with Ted Sim and cinematographer Emma Kragen.