Not One Size Fits All – Easyrigs and You

I’ll never claim to know it all. I’m a camera operator and there’s always going to be gaps in knowledge, new technology to learn, or new techniques to master. And you too should never stop learning.

So when I entered season 3 of a reality show, I was definitely surprised when the Easyrig production provided for me just didn’t feel right.

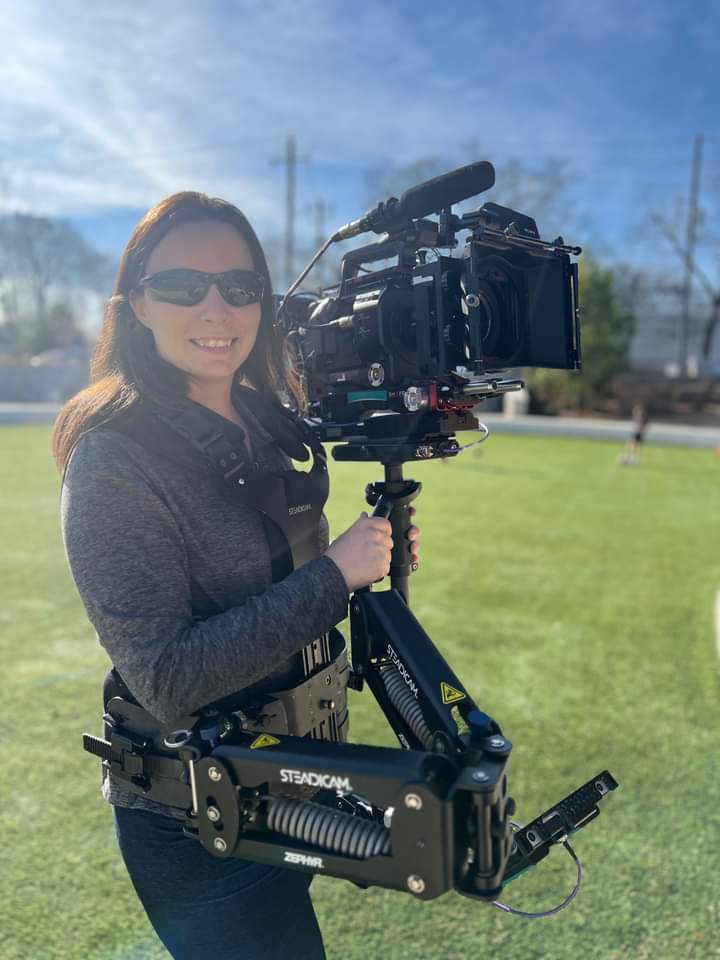
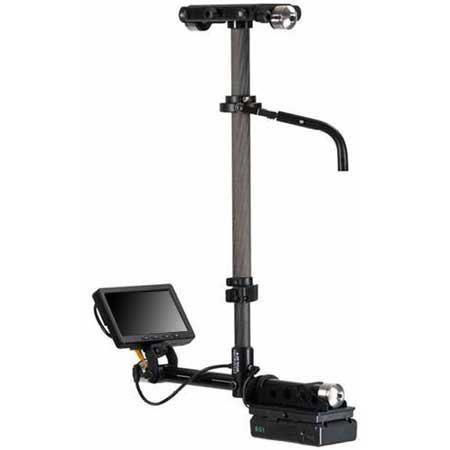
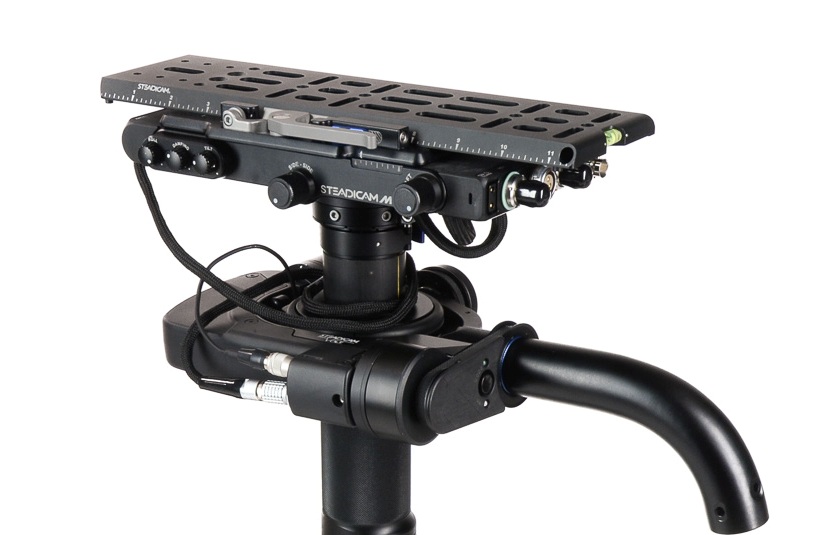
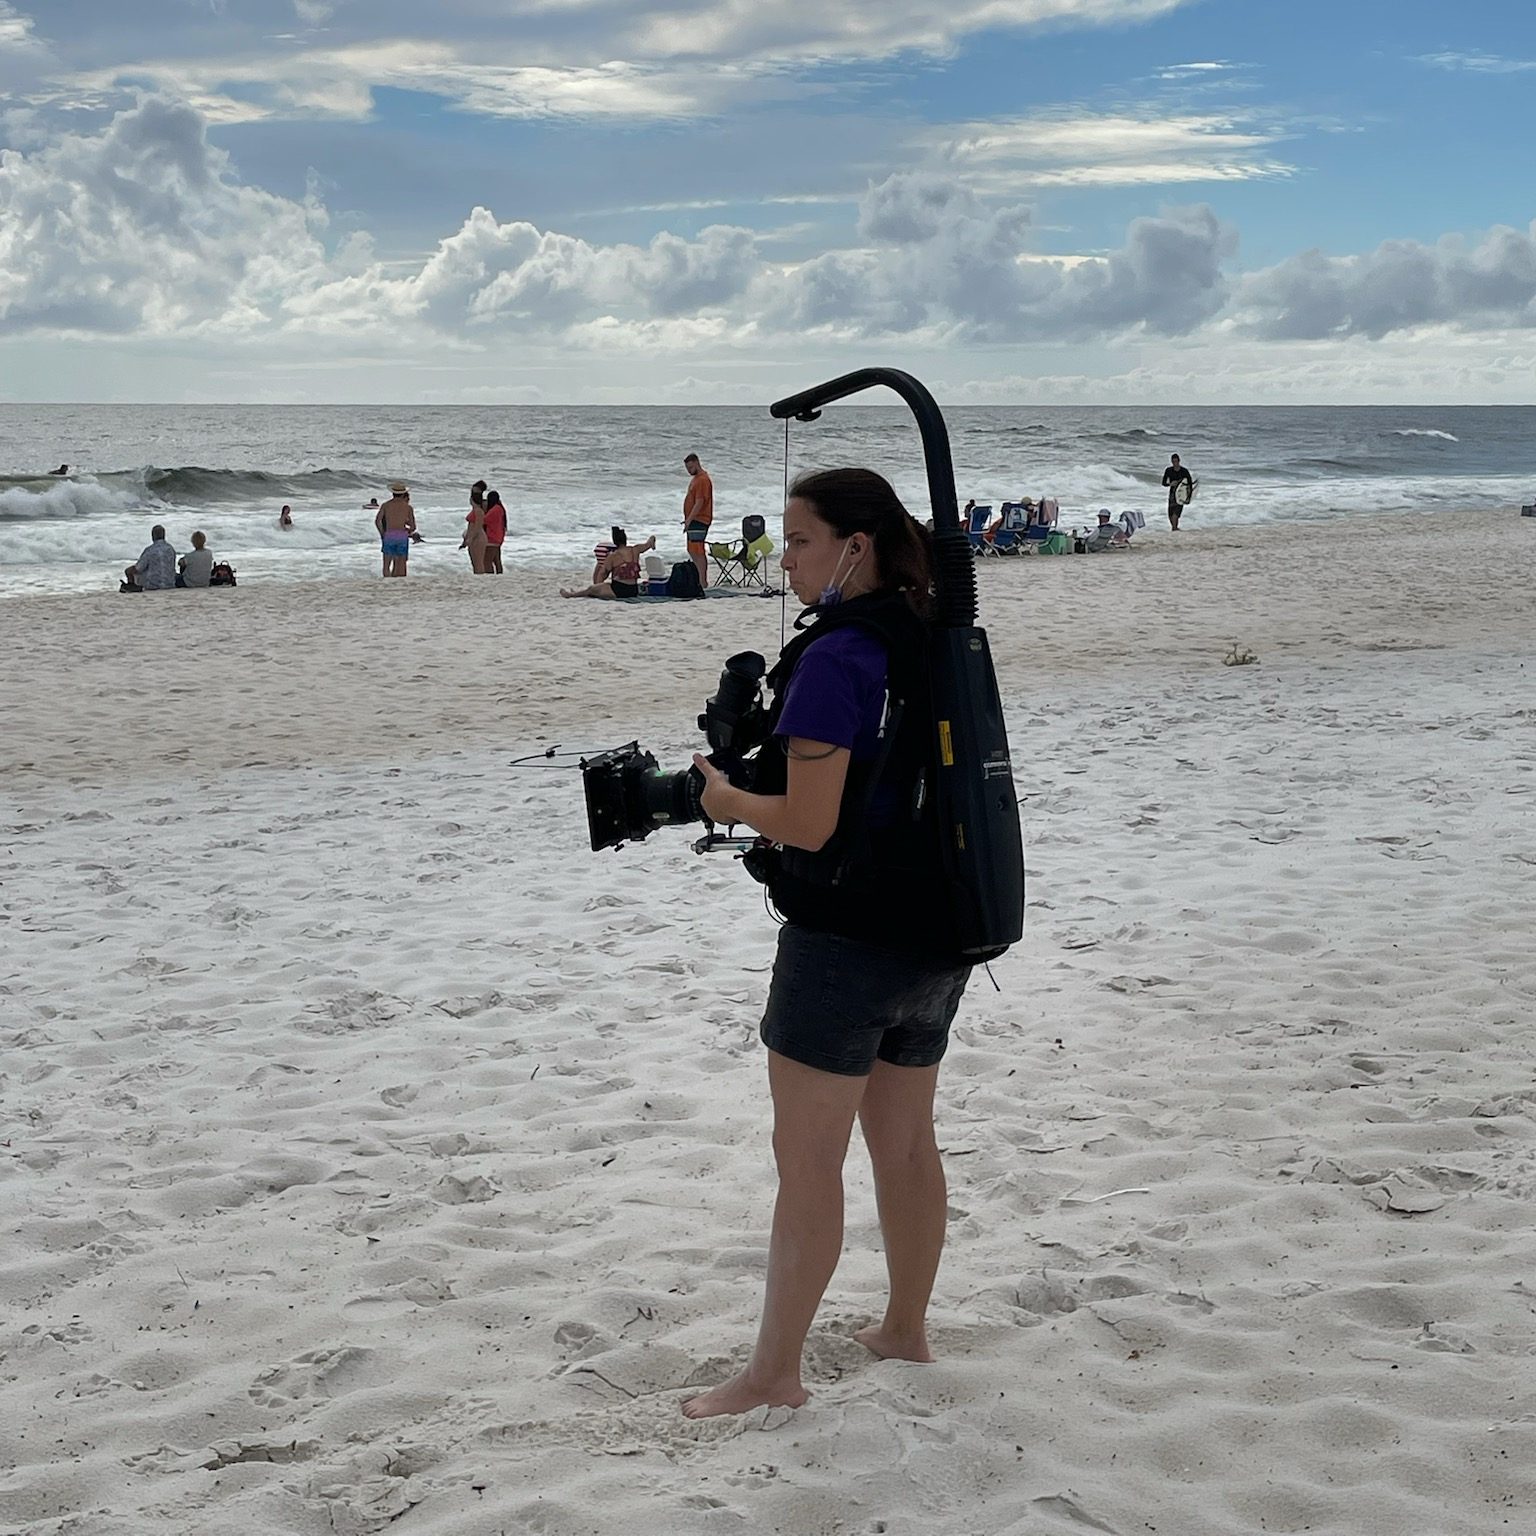
For those not in the know yet (and that’s okay, remember what I said about learning?) – An Easyrig is a camera support system that helps reduce back strain especially when doing handheld with heavier cameras. You probably wouldn’t use one with a smaller camera, like a Lumix or A7s, but for your bigger cameras, it helps a lot to distribute the weight.

It’s sort of a vest thing – different from the Steadicam because it’s a lot softer material in the front – and it has an arm over top that carries the camera via a clip and string. Everything’s attached to a pulley system inside the hardshell on the back.

There’s straps and things to help you adjust it to your body but what I didn’t know… was that the Easyrig wasn’t one size fits all.

We started a scene in an office where a bunch of cast members were doing a meeting. It was going to be a long scene, we knew that. It would be difficult to stop and start again, so we prepared for the long haul.

But as I was operating, I felt the vest slipping lower and lower. I tightened it to the point where it was nearly suffocating, and it was still slipping. The lower portion of the vest where there was a hard point eventually rested on the top of my thigh, and I tried to push through the discomfort.

Of course, that’s when my leg began to go numb.

I kept trying to readjust my body and how I was holding the camera in order to find some relief and power through the rest of the scene. But it wasn’t working. My leg was tingling and going numb and I knew there was a problem.

I finally got on the walkie – something I try not to do during a scene unless it’s absolutely necessary – and called out to production that something was wrong and I needed to set down my cmaera.

Crickets.

Unfortunately for me, they either didn’t hear me or nobody knew who should answer. That’s a problem.

My leg was getting worse. I was probably just going to cave and set the camera down mid-scene, which was something I was loathe to do. I called over walkie again. No response. But then my DP came in and said “Hey, my B cam needs a break. We’ve got to stop now.”

And we did. I took everything off, re adjusted again, took a mini-breka, and went back into it. The rig was slightly better after the break but… it was still starting to cut into my thigh. I found myself hiking up the bottom of it just to keep going with the scene. It was rough. I knew something was wrong.

I ended up calling 16×9 Inc for help. 16×9 Inc is an authorized Easyrig dealer, and the guy on the phone (I’m so sorry I don’t remember your name) walked me through what I needed to know about Easyrig fits. We decided that the right size for me would be a different model, the Easyrig Gimbal Flexvest.

When I got the new Easyrig it was like the clouds finally parted and I could see the sun.

So now I’m the first person who will tell female and smaller-framed operators “Make sure you get the right fit. Easyrigs are not all created equally. They are not one-size-fits-all.”

Putting the Easyrig on

The Easyrig slides on sort of like an awkward, top-heavy backpack. Whenever putting on or using the Easyrig, you need to be aware of your surroundings and of the people around you. You are now taller and bulkier, plus you have a camera that could swing free and hit someone if you’re not actively controlling it.

I usually adjust the waist straps first to get the rig situated properly on my hips, then clip on the chest harness part. Tighten straps for the chest harness so it’s snug, and do the same for straps that are connecting the top to the bottom.

Test the fit by grabbing the vest and seeing if it moves. If it does, you’re not tight enough. Then also test the length of the vest by seeing if your legs can move freely up and down without hitting the bottom of the vest. If anything moves, tighten stuff up. If’s its all the way tight and things still move (especially when you put weight on it) it’s time to consider a different rig or a different method to operate the camera.

It it absolutely not worth hurting yourself to accomplish any shot.

Instructional Video

Dom from LensProToGo goes over how to fit the Easyrig on your body in this video:

Be safe while operating, friends!

Podcast update

We’ve been hard at work bringing Lights, Camera, Remake to life. We are currently up to 11 episodes on Spotify and I’m slowly uploading the episodes to Youtube as well.

We will be looking for sponsors as we grow.

In the meantime you can support us by following on your podcast streaming platform of choice and sharing the episodes or reels we put out. This is a labor of love and we enjoy sharing it with everyone. The response has been wonderful so far.

Instagram: https://www.instagram.com/lightscameraremakepodcast/

Youtube: https://www.youtube.com/@LightsCameraRemakePodcast

How to Avoid Film Job Scams – Take Eight

Since I began this blog series on scams in the film industry, I started a folder on my desktop whenever I found a questionable job so I could put it in the next entry on the topic.

But… I couldn’t keep up. There’s too many. And the same names will pop up again and again, but new ones do too. There’s no way to truly catalogue them, so the best I can do is show you some examples from time to time, list the red flags, and hope to keep you from being taken advantage of in the future.

Google the E-mail

Scammers are a bit lazy too sometimes. You’ll see the same e-mail used by many different screennames. I’ve been chasing this mikebeebee email since at least July this year, having saved examples of this scam from different Facebook groups. I’m mentioning it now because it’s one of the recent ones to plague a group I manage.

This scam email was also used in July, when I saved these screenshots:

As you can see, it’s multiple names and “jobs” but the same scam email. I did blank out most of the names that posted because it’s likely they are hacked accounts and innocent of this posting. Or they could be completely fake profiles. Either way the most important thing is understanding the details of the scam.

Most recently, this one was posted:

Now, what happens if you apply to the fake job? You’ll likely get this email, with the name changed depending on the fake person you’re communicating with. Email screenshot attached with annotations explained below:

In Yellow: Generally bad grammar and grasp of the English language, so it’s likely an overseas scammer.

In Blue: If you are a professional, you do not need an explanation of how to do your job. This is a complete misunderstanding of how professionals are hired for a film set.

In Green: They use “kindly” which a lot of scammers use for some reason, and they’re also asking for all this identifying information. Probably for identity theft or to further sell your information to future scammers.

In Red: This part is where you know it’s a scam. The guy claims he will pay you $2000 before the job. Never, ever accept payment before a job is done. This is a check phishing scam. They are just trying to steal Your money, which they will do once you see the second part of the red section: “This covers your $1500 upfront payment and the talents'(sic) fee ($4,000) payable to their manager.

This is how the check phishing scam works. They issue you a fake check, and before your bank notices the check is fraudulent, you’ll be issuing a check from your own balance to pay the “talent” who is actually the scammer. You are out at least $4,000 at the end of this scam.

According to the FTC, “Fake checks can take weeks to be discovered and untangled. By that time, the scammer has any money you sent, and you’re stuck paying the money back to the bank.”

Production Assistant Scams

This latest one was brought to my attention by a community member on a page I moderate. I’d had my suspicions about the job when it was posted, but I didn’t have enough info to delete and ban the poster until I received further info.

Here’s why this job looks suspicious at first glance and why I didn’t delete it immediately.

  • Casting call – for a production assistant? You only do casting calls for actors. Crew calls for film crew. I chalked this up to someone green in the industry.
  • Grammar “Seeking for.”
  • 3 days, 4 hours of work for a lump sum payment of $700. Again, I thought this was an inexperienced person who doesn’t know how day rates work. But 4 hours a day is suspicious even for a short film.
  • The poster turned off comments. Scammers do this because they know people will start calling them out in the comments. But insecure people also do this.

I couldn’t annotate this one because as soon as I started, I realized I was underlining the entire thing in red. Let’s look at those emails!

Red Flags:

  • Giant block of text. Most gigs will email at best like two sentences to see if you’re available.
  • Atrocious grammar and spelling. They don’t even spell their email correctly.
  • Wishing you good health. This is America, we don’t have that.
  • Apologizing. For some reason a lot of scam communications start with apologizing for being so busy. Maybe the intent is to make them look like they are in high demand or something.
  • Audition – for a production assistant? Oh no honey. But this detail confirms my suspicion that this was also a copy & pasted scam for an actor as well. Remember how the job post was a “Casting Call”? I bet this same scam showed up elsewhere targeting actors or models.
  • I laughed at “Camera Man.” The term is camera operator. But they probably meant Director of Photography.

Let’s look at the next email!

Red flags:

  • Scammer asking where you live (including the state).
  • Audition and PA again.
  • “Is that rate cool with you?” No. Because it’s fake.
  • Are you available the dates we already established?
  • Why are they asking what you’re currently working on? This is none of their business.
  • Asking for years of experience for an entry level position.

And here is the grand finale:

Red flags:

  • Advance payment – It’s a check phishing scam!
  • Also… sponsors? Wth.

Thanks to the community member who sent the screenshots and reached out with questions about identifying scams.

Sources:

Federal Trade Commission – Consumer Advice: How To Spot, Avoid, and Report Fake Check Scams

The Evils of the Rolling Take and Reset

Let’s dig into a pet peeve of many on set: the rolling take.

A rolling take is when you keep shooting and keep repeating the action. Like an actor walking in to a room who flubs a line and goes back to start it over again. That can be a valid reason for a rolling take. No need to re-slate and re-call action. Just try it again.

An Insert Shot: A watch being picked up and brought into the frame is a valid reason to do a series of the same action without cutting in between.

A rolling or series take might be done on a particular insert shot to get it right. Let’s say your actor needs to throw a letter to land on a desk just right. The director might ask for a series or rolling take in order to keep attempting that throw to get it the way they want. No fuss, no muss, and no wasting extra setup time to get that insert shot that you’ll see for two seconds on screen.

Directors don’t work the slate but I’ll allow this since it’s clipart.

Imagine this scenario: It’s after lunch. The Assistant Director is informing everyone for the third time that you are now an hour and a half behind on the schedule. You have several more scenes to light and shoot and somehow you have to make up a significant amount of time. Hence the anxiety that leads inexperienced directors to try shortcuts. One of those shortcuts is overusing a rolling take.

After experiencing this on a number of films, I’ve observed that green directors love to overuse the rolling take. They’re feeling the pressure and just trying to get footage in the can. The AD, meanwhile, is just trying to make their day. Now suddenly, you’re filming scene coverage as a rolling take, not cutting when you reach the end of the action, but waiting for the actor to reset and just going with it, maybe for multiple “takes.”

A rolling take going on and on is more trouble than it’s worth.

Time = Money

First, what should be obvious — you’re using up footage. This became less of a crisis when most of us went from actual film stock to digital, which is a much cheaper alternative, but digital does not mean free.

Film costs include the film stock, developing, processing, and digitizing so you can edit on a computer.

But just because you can hit “record” on a camera doesn’t mean that doesn’t cost money. Each card needs to be purchased, and you need to have enough available media to get through the day’s shooting without having to write over those cards with additional footage. Ideally, you want your DIT or media manager making backups throughout the day. That means the production also needs to purchase storage and backup storage for that media.

So let’s say you think you know the costs and you’re still cool with doing 40 minute takes instead of a few 5 minute takes. All that footage needs to be downloaded and viewed, meaning you’re paying for the media manager’s time to download that footage and make copies, as well as the editor down the line. A single 40 minute clip is just going to take longer to download and transfer. And you might be paying overtime to the media manager who is staying late dumping all that footage.

Wear and Tear on Cast/Crew

In the moment, if you abuse the rolling take, you’re quickly using up the energy reserves and physical strength of your cast and crew.

You’re also using up your camera operators and 1st ACs and boom ops and everyone doing something physical for that scene that no longer get that tiny bit of rest to reset themselves.

  • The cast has to stay in-the-moment and may get frustrated, flubbing lines more and more.
  • The boom op has to hold that boom pole and actively follow whoever is talking without getting that small break in between.
  • The camera operators might be doing handheld or Steadicam and are using up their muscles faster.
  • 1st ACs, staring at a screen for minute changes in focus, don’t get to rest their eyes.
  • Script supervisors’ notes get complicated as the same scene plays out multiple times in the same take.

When I’m doing Steadicam or handheld, my least favorite thing is a rolling take, especially if it’s long. I just need time to reset. Sometimes there’s an adjustment needed in a handgrip on a shoulder rig or I need to fix the balance on the Steadicam.

Other concerns? Using up batteries! You might be playing beat the clock with what battery you have left in the camera or on the mic packs.

Closing Thoughts

Using a series or a rolling take can be done with purpose. It’s just another tool in your kit. Abusing it can lead you to creating an uncomfortable work environment for your crew. So before you panic and decide to just “roll on everything” look at it critically and see if a rolling take is necessary or if you need to re-evaluate and be more concise with your time.

The Atlanta Film Yard Sale and Building a Film Community

Last Saturday was the Atlanta Film Community Yard Sale, and I’d like to gush about it a bit.

In a group chat, fellow camera department lady Erin Zellers made a slightly joking comment about us all getting together to have a yard sale. I did a similar event with Film Impact Georgia last year which was popular, so I heartily agreed and wanted to take part. Together, Erin, Tina Somphone and I started planning the event we had no idea would grow from a couple of folding tables on someone’s lawn to the event of the year.

The Venue

We started thinking along the lines of a traditional yard sale. Getting a group of film friends to sell their gear in one place. A lot of people seemed interested, and we realized we’d outgrow a front yard really fast. A studio rental was the ideal way to promote film in a place that shoots film while avoiding potential weather delays.

24ATL Studios, an LED Volumetric Wall Studio in Doraville, GA, took us up on our offer. Our challenge was coming up with the money for the rental. That’s where sponsorships came into play.

This image has an empty alt attribute; its file name is 24-studios-space-pic.png

Here’s a still from a short film I worked on at the studio.

Sponsors

Our sponsors ran the gamut from traditional film to grip gear to beverage companies.

  • Cinder Lighting and Grip
  • Kodak Film Lab Atlanta
  • Image Engine/Elemental
  • Guerilla Gear
  • Hammerhead Wheels
  • Atlanta Film Co.
  • Local 600
  • Plaza Theatre
  • J.R. Crickets (food truck)
  • Topo Chico
  • Fontis Water

Our sponsors provided us not just with money to rent the studio and provide for our attendees, but also gifted items as prizes and even held free giveaways. Several of them held demos at their booths if they attended, like Hammerhead Wheels giving people the opportunity to test out the wheels or Kodak with their film loading demonstrations. Image Engine and Elemental owner Marque showed the set of wheels that controlled the rig on his impressive camera car. Cinder gave away tons of free expendables to grateful attendees.

Vendors

In addition to our sponsors, we needed vendors to sell their goods! The goal was to have an event specifically catering to the film industry. Only film, photography or related gear would be allowed.

Our vendors were a mix of companies and individuals. We got a good selection of everything from digital cameras, lighting gear, sound equipment, Steadicam accessories, photo equipment and even a wardrobe seller. Next year we’d like to expand that and get some more variety in departments represented.

The Why of it All

The Atlanta Film Community Yard Sale put an emphasis on community.

This event provided a safe place for people to buy and sell their gear while putting them in touch with the companies they’d interact with in Atlanta’s Film Industry. It was also an excellent networking opportunity. So many friends and colleagues were present, but so many new faces were added too. Folks went to tables and learned about different lenses or compared favorite video monitors or went over the finer points of certain lighting equipment, getting to know their fellow filmmaking professionals and learning some things in the process.

What I was happy to see what not just the sponsor’s support, but all the film industry folks who came just to attend the event and talked about how much they enjoyed it and wanted another.

We had to contact a lot of people to get the word out about this event and also to garner the support we needed. All those supply runs and sponsorship pitches and flyer distributions illuminated what should have been obvious in the beginning – Film is a community, and we were here to help support it.

Much like an event being organized, the film industry thrives on those connections and friendships built along the way.

So long for now from the 3 Gworls.

From left, Tina Somphone, Erin Zellers, Bridget LaMonica.

Steadicam 101: Balancing and Operating

We’ve learned why we use a Steadicam…

We’ve covered what pieces make up the Steadicam…

Now it’s time to balance and actually use the thing!

Balance

A Steadicam cannot work properly if the rig is not balanced.

Again, this is a simplified version of balancing. To really learn, you gotta get your hands on a rig, or at least observe a Steadicam operator as they prep.

First of all, you need to find the center of gravity, or cg, of the camera. After the camera is built (i.e. it has all the accessories and lens you’re going to use for the shot) you can find the cg by rolling the camera body on a rail. Where the camera is balanced on that rail, mark with a piece of tape or just remember where it is.

  • The camera is placed on the sled via the cheeseplate on top.
  • The post is lengthened to the appropriate length. This is in relation to how much weight is on the camera at the top.
  • On the top stage are the adjustment knobs to move the camera right and left or front and back. This is the fine adjustment.
  • If the rig is perfectly balanced while stationary, you’ve achieved “Static balance.” If there’s time, proceed to:
  • Dynamic Balance.” Spin the post on the balancing peg and see if the camera tilts any direction. You then make corrective adjustments with the fine adjustment knobs, moving the monitor in/out and moving the battery in/out.
  • adjust the tension on the arm so the camera floats where you want it.
  • the vest is adjusted to the operator’s body so it doesn’t slip and pressure is exerted evenly across it.

Operating

Actually operating the Steadicam requires a lot of physical and internal adjustments.

The operator has to have good posture. They walk forward, smoothly, making minor adjustments as needed. They avoid accidentally cross stepping, so they don’t trip.

While the operator’s feet carry them where they need to go, their hands are busy making sure the camera is where it needs to be pointed. The left hand is on the gimbal, in charge of panning, while the right hand lives on the handle that connects to the arm, moving the rig up and down as needed.

For more in depth information about Steadicam operating, check out the Steadicam Operator’s Handbook by Jerry Holway and Laurie Hayball.

Steadicam 101: What Components Make a Steadicam

When the Steadicam operator walks on set and starts setting up their gear, it can look pretty impressive. Here’s this guy or gal with cases of specialized equipment that looks like it belongs to Robocop.

Or maybe Alien.

Contrary to this picture, Steadicams are not all that great at eradicating alien threats.

So what part is the Steadicam?

Ah, not an easy answer actually.

I’ve worked with a number of newer directors, and there’s a bit of a learning curve I often have to help with there. Sometimes I’m asked “So you have a Steadicam? What camera is on there?” And I answer, cautiously, “Whatever camera you want within the weight limit.” But then I figured out…some folks don’t know the camera is actually not part of the Steadicam. The Steadicam is the device that moves the camera around. It’s a dolly if it had feet and shock absorbers instead of wheels and rails. It’s a tripod with an ego. And it’s also not those things.

The Steadicam mainly consists of 3 major components: The Sled, The Vest and the Arm.

Pictured are parts of the Steadicam M-2.

Sled

Pictured is a Steadicam Pilot, a smaller rig for DSLR sized cameras.

The Sled is the post you see here. The camera is mounted on top, there’s a monitor at the bottom, and batteries power everything from the bottom. This is where the electronics live. There’s wires inside that travel from the top of the top stage to the very bottom where the batteries and monitor reside.

Arm

Pictured is a G-70x arm. This arm can handle 13-70lbs of weight.

The arm is really where a lot of the magic happens. The arm has sections and springs that compress or expand to lift or lower the rig with ease. The arm also isolates movement, taking away the natural bounce of a human’s walk and translating it into smooth moving video.

Vest

Two types of vests pictured above: A Fawcett Exovest and a GPI Pro vest. There are several varieties.

The Vest is where this contraption connects to a human body. The vest takes the weight and distributes it across the body. They are quite adjustable. Only in certain cases will an operator need to get a specific type of vest, due to small size or even just preference.

Let’s take a look at the top of the sled

Here’s an example of the top stage (top platform where the camera ends up being mounted). There’s a plate that goes on the very top that you screw the camera into. Adjustment knobs on the sides move that plate either left and right or front and back. This will serve in helping balance the camera.

Also on the top stage are all sorts of places to plug in wires! Several of these inputs are to get power from the battery at the bottom into the camera or to power the accessories. Why not just leave a battery on the camera when you put it up there? Well, you can, but anything you put on the Steadicam will add more weight. Sometimes, you gotta remove as much weight as possible.

You can also see the SDI inputs (pictured right, at the short end of that top stage). This is how you get the video feed from the camera to the monitor at the bottom of the sled.

The Gimbal

This is the handle that sticks out from the sled post and connects to the arm.

The gimbal is 3-axis, meaning it moves freely in three directions for pans, tilts and roll. The gimbal handle that connects to the arm is where the right hand goes, and the handgrip below on the post itself is where the left hand goes. This can be reversed for left-handed users who operate “goofy footed.”

Other Accessories

Plenty of other accessories and mounting devices enable the Steadicam operator to work in different conditions. There are mounts so they can operate from a car, more advanced gimbal technology in the form of the Volt, and things like rickshaws and the Trinity to change the possibilities of what operating can offer.

But this is an intro series and you’ll have to dig into all that when you decide you want to learn more.

Part 3: Balancing and Operating, is coming next.

Steadicam 101: Why Use a Steadicam?

I had the honor of co-hosting a Steadicam workshop for the Women in Focus Summit alongside fellow operator Kurush Bakhtiari. The event run by Ladibug Studios and ColourCo Rentals had several informational panels on camera, lighting and directing with a focus on getting more women and non-binary folks into production.

Kurush with his Archer and Klassen vest, me with a Zephyr kit.

I didn’t expect all of our attendees to take up the mantle of Steadicam. Sure, maybe we inspired a person or two who was curious or knew nothing about the skill, but learning about Steadicam is not just for the people who will wear the vest.

Plenty of crew members interact with the Steadicam operator: The AC who builds the camera to go on the rig, the grip who takes the rig off the operator when they need a break, the other grip who acts as a spotter for safety. Widen your parameters also to the 1st AD who is trying to keep a schedule and time transitions between sticks and camera accordingly, and to the director and DP who will be asking the Steadicam operator to bring their vision to life.

Understanding the roles, responsibilities and limitations of other positions on set just makes you better at your own job.

This will be a 3 part series to go over the basics.

What is a Steadicam?

Pictured: The Arm, Sled, Docking Station and Vest of a M2 model Steadicam.

A Steadicam is a tool used to create fluid dynamic shots unlike any other camera movement apparatus. It consists of a vest worn by the operator connected to an articulating arm and a post that holds the camera and electronic components. The arm does the job of evening out the natural bounce of a body walking, smoothing out the shot. If you were to attempt the same with handheld, it couldn’t be as smooth. Even if I breathe with a camera on my shoulder, the movement translates to the image.

Examples

Popular Steadicam examples include the stairs run from Rocky, the hallway shot in The Shining, and the Copacabana scene in Goodfellas. If you haven’t seen those, by all means click the links and watch the clips. Since those are the most commonly used examples, I wanted to show some fresh ones. Kurush and I put together a video of examples of a handful of other movies that have inspired us.

What we can learn from these examples:

Point Break: The camera expertly follows a high energy scene in a police station, whipping between characters and moments to carry the scene forward. This is a more interesting take on the typical police station scene without being static and stoic. This clip gives a real sense of space in the station, from the character’s entrance to how he moves around the bullpen. This shot switches between framing the main two characters from behind, getting a wide shot of the entire place, and returning to frame the main characters from the front. There’s a nice variety of shots without ever needing to break away for coverage.

Snake Eyes: In this example, we see how perspective changes as the Steadicam moves around the scene. At one point, the Steadicam becomes the point of view for one character, the boxer. When we reveal who it is, the Steadicam backs up to include him physically in the scene.

Birdman: The movie is depicted as if it is a single camera following characters around for a continuous shot. Since that is the technique, shots are constructed by the camera moving closer or farther away from speaking characters, moving around the stage to reveal things and traveling between locations around the theater by following one character at a time.

Baby Driver: This is near the beginning of the film, introducing Baby and his connection to music in the film. This is a well choreographed and timed performance between the camera operator and actor. See how things are revealed as Baby walks how each element of the scene adds to the soundtrack (honking cars, a trumpet player on the street, pedestrians). Pay attention to the background on a second watch of the scene.

Last Night in Soho: In this thriller, Eloise is experiencing flashbacks to the 60s to a vivacious woman named Sandie and a connection to a series of murders. Eloise sees herself in Sandie’s perspective, sometimes in the mirror, and sometimes replacing her in the scene. This is another well choreographed number. In the video I included the behind the scenes clip showing the Steadicam operator. Note how Eloise waits for her turn to cut in to the dance, and how moments are revealed as the Steadicam travels around the main characters. You can also see a spotter helping the Steadicam out. There’s a lot of moving parts and nobody wants to have a camera run into them!

In Part 2, we’ll talk about the components of the Steadicam and why balance is so important.

Why Aren’t There More Women Directors?

Women have got to realize something:

We’re not funny…

We can’t do action…

We certainly can’t direct…

Maybe we should go truly old school and just have castrated men play all the parts? Worked in Shakespeare’s day, didn’t it?

Obviously the above is satire from my part, but it’s not satire on some corners of the Internet. When a movie does well, suddenly it’s “Oh my gosh, women can be funny!? What a good director! Amazing!” but when a movie goes bad, suddenly it’s “This is what happens when you cater to women. This was a bad female director, actor, writer, etc.” We’ve all heard the Madame Web jokes at this point.

I personally love the part where she says, “It’s Madame Webbin’ time.”

I too did not see that movie. But I probably will because I’m a glutton for punishment.

A 2024 Guardian article pointed out the discrepancy of proposed diversity and inclusion promises and what actually happened.

USC’s Annenberg Inclusion Initiative called out the major studies who claimed they would promote more diversity in their hiring practices after 2020 as “performative.” The study didn’t show any actual progress towards pushing for that change.

Women comprised 16% of directors on the 250 top grossing films in 2023, according to the study conducted by the Center for the Study of Women in Television and Film at San Diego State University. That’s down from 18% the year before.

I’m sorry, down?! Aren’t we more inclusive, more diverse than ever? Nope.

Of the 116 directors attached to the 100 top grossing films of 2026, only 14 were women. Look at those numbers again. That’s 12%.

These numbers are in direct contrast to the women dominated juggernaut of 2023, Greta Gerwig’s Barbie which was a $1 billion success.

By the way, only 4 of those directors were women of color.

Diversity and inclusion are — spoiler alert — not a bad thing. I work in the Atlanta film industry. I work with some of the most diverse crews you’ll see, and yet I still see so many sets that are primarily white and/or male.

As people complain about superhero fatigue or girly movies just not appealing to mass audiences (The Marvels, Madame Webb) I want to share this piece of a statement from Dakota Johnson, the titular Madame Webb herself:

Dakota Johnson survived everything about Fifty Shades of Gray, she can surely shake this off too.

“Decisions are made by committees….art based on numbers and algorithms.” This hits hard because the shadier businessmen of Hollywood are surely looking to A.I. to pump out algorithm-satisfying garbage in order to save a buck. But for years it’s people sticking their fingers in where they probably don’t belong.

Film is a collaborative medium, and that’s a beautiful thing. I’ve seen my work in a whole new light after an editor or colorist has done their job, and I’ve seen scripts blossom through the work of careful critique and notes. Where it falls apart is when execs or producers or whoever start trying to make their mark and just doing arbitrary things they think the audience will want. Or they want. Like a giant mechanical spider in Wild, Wild West, which was originally pitched for the unproduced Superman Lives script. I don’t even have time to get into that one. Read about it here.

One of those arbitrary things is hiring someone like themselves to direct a film. Men in power tend to hire men that remind them of themselves.

This Variety article references a study about how first time directors get fewer offers, but even experienced directors are more likely to be hired if they are white and male. The stat speaks for itself:

  • 4.8% of experienced directors are female. 95.2% of experienced directors are male.
  • 16.3% of experienced directors are BIPOC, the rest are white.

“The results of this study are eye-opening. For underrepresented groups, there remain obstacles, structures and processes that stand in the way of getting that critical first shot. I’m encouraged that first-time directors get equal results, but they just need to be given equal opportunities,” said Dr. Yalda T. Uhls, founder of the Center for Scholars & Storytellers at UCLA.

It’s 2024. The time for arguing about more inclusivity seems to be falling on deaf ears. So let’s shout it a little louder. And in the meantime, keep your mind open about who to hire on your next film. You may be surprised by the incredible artists you connect with.

Sources:

Study shows ‘catastrophic’ 10-year low for female representation in film

First-Time Directors Still Have Limited Opportunities in Hollywood, New UCLA Study Reports (EXCLUSIVE)

Giant Spiders, Giant Flops: The Enduring Awfulness of ‘Wild Wild West’

Featured Image: Greta Gerwig directing Ladybird.

Unusual Shot Design to Evoke a Tone: Knock at the Cabin

My film professor Bear Brown would always say “Never stop learning.” We do this by practicing the craft of cinematography, reading about it, learning new technologies, and dissecting movies and TV to understand what was achieved.

Let’s look at the shot design of M Night Shyamalan’s Knock at the Cabin together!

While vacationing at a remote cabin, a young girl and her parents are taken hostage by four armed strangers who demand that the family make an unthinkable choice to avert the apocalypse. With limited access to the outside world, the family must decide what they believe before all is lost.

Anamorphic Lenses

Let’s dig into how I knew this film was shot on anamorphic lenses even though I can’t find any solid info on which camera or lenses were used.

All I could find was that Shyamalan wanted a 90s horror-thriller vibe and filmed with lenses from the 90s. These were used in flashbacks primarily. We could have had a mix of lenses and cameras for different scenes. That’s something the Directors of Photography (2 in this case) and the director would hash out. Ultimately it boils down to what the right tool is to tell your story. Given the unsettling feeling of the narrative, using anamorphics does make sense.

Anamorphic lenses capture twice the amount of horizontal image as a traditional spherical lens. that image is then de-squeezed in post production editing to get the final image. I’ve done a couple Steadicam gigs on anamorphic lenses now and it’s always a weird feeling seeing that strangely square image squished onto your monitor. (You then of course go through the monitor settings and get it de-squeezed so you can see what the final image would be).

Anamorphic lenses have unique properties. You can get fun J. J. Abrams style lens flare, oval-shaped bokeh (instead of the usual circular bokeh). They also feature reduced sharpness (focus is not always perfect!) and increased distortion of the image around the edges.

I mention all this not just because of the beautiful bokeh I witness in the background of certain shots….

look at those pretty bokeh ovals

… I also say that because it motivates the characters to be up front and center-framed more often than on the sides. There are a lot of shots where characters are center framed. The viewer’s focus goes to the center and everything else is set dressing for whatever the center of attention is.

You also notice distortion if you look at any straight lines, such as doorways, bookshelves, etc. The lenses make them bend away at an unnatural angle. As you’re watching a film with this lens, you don’t typically notice this if you’re not looking for it. Your mind is focused on the story and characters and subtly translating this background information to be a little unsettling or off-putting.

A lot of other shots, however, were framed predominantly on the right. This is interesting because assuming you read left to right, you would look at the image from left to right, even if it happens in an instant. Often times, an important character will be on the left of the screen. Or you may have an equal distribution of shots that are framed left, right, and center. What made these right framed shots stand out was the sheer number of them. When things weren’t centered, they were right of frame.

I believe this was to keep things off-balance and to give the viewer time to scan the image before settling on the subject in frame.

Camera Movement

The use of camera movement was very intentional in this film. Most of the time, it felt like the camera was attached to whatever it was following, like Leonard’s low shot of his feet walking in the woods.

You can see that walking shot in the beginning of this clip: https://www.youtube.com/watch?v=Pgk1VGlWiDI

Another great shot, which I can’t find a clip of, is when the parents are confronting the people who invaded the cabin. the camera is basically stuck to a close-up on the parent’s face as he circles in the cabin. It was probably accomplished using a snorricam technique. A snorricam is a device that mounts a camera directly to an actor. Think “way too much effort for a selfie.”

Even better was this really cool shot of Leonard swinging his weapon. The camera movement is perfectly timed and matching the angle of the axe coming down.

Big spoiler if you see the video of this scene, but here’s Leonard swinging that axe: https://youtu.be/p3Zth0YEn5A?si=07_S3tmxakWRlmrF&t=147

The DP’s also used a famous technique of a zoom-dolly (ala the famous beach scene in Jaws) to underscore when Leonard is proving that his doomsday story is real. The technique is achieved by utilizing a zoom and pushing in or away from an actor at the same time. The resulting distortion creates an uncomfortable feel that warps reality around the character. Pretty cool!

Look at how the perspective of the TV behind him changes over the course of this shot.

See that zoom-dolly in action here: https://youtu.be/xf8ILZnoSr4?si=wDYOefTrl0ymYX_n&t=74

Details hidden in the background

There’s a flashback to when Andrew and Eric adopt Wen from China. I used Google Lens to translate this text: “Children, when we love others, we should not only love them with words and tongues, but also show them in actions and sincerity.” It directly ties into what Leonard says about this couple having to choose who should die in order to save the world.

The blackboard in the cabin had a few questions on it. I started looking at it but didn’t really think about them until I came across this screenshot.

The questions are:

  1. Who invented chess?
  2. The first color named?
  3. Why school buses don’t have seatbelts?

The answers to those questions, when searched are:

  1. Uncertain. The origin is unknown though it likely originated from the Indian game of chaturanga.
  2. Light and Dark (White and Black). In almost all languages this is the case.
  3. They are bigger, heavier, and sit off the ground. Buses protect kids through compartmentalization.

In this small detail, we see nods to our Indian director (Shyamalan), the concept of light and dark (good and evil) and the safety of many. It directly speaks to the film’s themes and it’s just a thing in the background you might miss as you’re watching the action of the film take place.

Credit to the DP’s Jarin Blaschke and Lowell A Meyer for some really interesting work.

So is the movie worth watching?

Eh, well that’s up to you. For the purpose of seeing these shots in action? Sure. I like the unique way this film was shot, obviously enough to write about. But upon finishing the movie with a friend, we were both left with a bunch of questions and a puzzling sense of “was this movie good or not?” The movie both under- and over-explains the premise. I don’t get answers I want. I’m left wondering if certain actions were necessary. I think the bones of a good story are there, probably present from its beginning as the 2018 novel Cabin at the End of the World by Paul G. Tremblay. Shyamalan’s script version is reminiscent of the awkward dialogue I don’t like in his other movies. Maybe I’m biased. I’m still mad about The Last Airbender and annoyed that I wasted time watching trees blow gently in the breeze in The Happening.

Sources:

Knock at the Cabin – Prime

What are Anamorphic Lenses? – PhotographyLife.com

Anamorphic Lenses: The Key to Widescreen Cinematic Imagery – BHPhoto

Small Details You Missed in Knock at the Cabin – Looper

A Film is Born Three Times: Pt. 2 Production

“A film is born three times. First in the writing of the script, once again in the shooting, and finally in the editing.”

Robert Bresson, French film maker.

Part 2 of 3. Read Part 1 on Re-writing here.

You’ve written the script. You’ve done the pre-production. You have your shotlist in hand and you’re ready to shoot. Surely, you have an image of what your film is going to look like in your head. The thing is — it’s really hard to make that a reality.

Once you’ve made your first or even fourteenth film, isn’t part of you a little disappointed it doesn’t look exactly how you pictured it? No? Just me, okay.

There’s a number of factors that go into why your film will change during production. Let’s go over a few reasons:

  • casting
  • location
  • equipment

Casting

You and a friend are prepping for a film competition and it’s the night before your first shoot day. You’ve got your gear and props, your script finalized, your cast set and call sheets sent out. Now all you need is–

Oh wait, your lead actor just quit. Now it’s 11pm at night and you’re supposed to be filming a mere 10 hours from now.

This is exactly what happened to Desiree and I when we were prepping our Mystery Box Film Challenge short. Our lead actor was cast via the film commission in Philly, and he decided at 11pm the night before the shoot that he wasn’t going to drive to Northeast Pennsylvania to do the short. Because he’d have to get up early. I can’t even make this up. The actor had the script and knew where he’d be filming for days in advance, and chose literally the 11th hour to change his mind.

Desiree and I very calmly… went into panic mode. After a moment of us going “literally, WTF” we contacted everyone we knew in the local film community, and the search was on. Friends contacted friends until we connected with a guy named Joe, who was more than happy to help us. He turned out to be a great actor, a better choice than we originally had, and our short film continued as scheduled.

Especially in the case of short films and volunteer projects, you could lose people at the last minute. The goal is to have a network you can turn to in order to fill in the gaps. Or start getting creative with the cast you already have.

Location

When I originally wrote The Road Less Traveled, I had envisioned a cat and mouse chase inside a literal slaughterhouse. Instead, we ended up in an antique barn, which I ended up liking so much more.

Sometimes your limitations on location will be budget related. You intended on x but had money for y (or z was free).

Weather, too, can play a part. If originally your location was going to be outdoors and a storm blows through, you might have to re-evaluate and see if you can film an indoor scene instead.

My thesis film, Routine Procedures took place in a crater….but since that’s impossible to create on no budget, we filmed in a sand pit used by construction. We filmed on days they weren’t out scooping the sand. A unique feature was that a lot of it was flooded, so we needed to purchase a canoe to get to the optimal location.

Equipment

You’ve got everything planned. Absolutely nothing could go wrong.

You get the idea now, right?

You don’t have enough batteries to continuously shoot. Your media fails. Your stabilizer isn’t stabilizing. Your mattebox donut has ripped and too much light is now hitting the filter.

This is one example where we had to replace a piece of equipment with something unexpected. The rubber “donut” that goes from the mattebox to the lens had torn, and too much light was hitting the filters. We replaced it with an old school mousepad with a hole cut in it. It worked great! Plus I ended up seeing this kittycat mouse pad on the next project I worked with this DP so obviously it made an impression.

Film sets are Murphy’s Law Incarnate. You need to be able to roll with the punches.

The following scenarios have happened to me or someone I know:

  • the DP underestimated how much media we’d need to record on and nobody media managed even after I pointed out we were going to run out of cards. The last scene of the day was filmed shooting one line of dialogue at a time on the last two minutes of card space.
  • Your wireless follow focus has lost signal and has some issue that can’t be solved, so you pull it off the barrel of the lens and pull focus by hand (like the pioneers did!)
  • The director suddenly wants a Steadicam-like shot without there being a budget or an actual Steadicam around. You see a rolling desk chair and get some ideas…

Don’t let an equipment malfunction limit your ability to shoot your film. There’s often a way around it if you take a moment to look at your options.

A Steadicam setup I did years ago for someone’s crowdfund campaign. The camera was way too light for the Steadicam, so I bongo tied a few 5lb ankle weights on there to compensate.

One of the absolute best skills you can have as a film maker is problem solving. If you can be adaptable, creative and a team player, you can find a way around your problem and into a solution.